You can help support this website by buying me a coffee!

Sometimes it is useful to have an SSL certificate for testing servers in a lab environment. This guide will show you how to get a free SSL certificate for your lab using Zero SSL.
Zero SSL Certificates
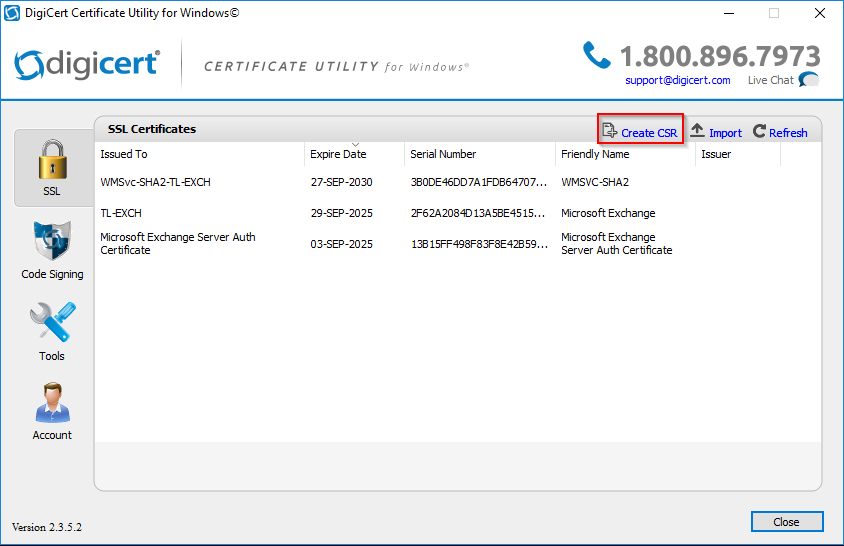
In this example, we'll be using the Digicert certificate utility to create a CSR to get a certificate for a test Exchange server in our home lab.
Download the Digicert Certificate Utility
https://www.digicert.com/util
Extract the zip file and run DigiCertUtil.exe

Accept the license agreement

Create CSR
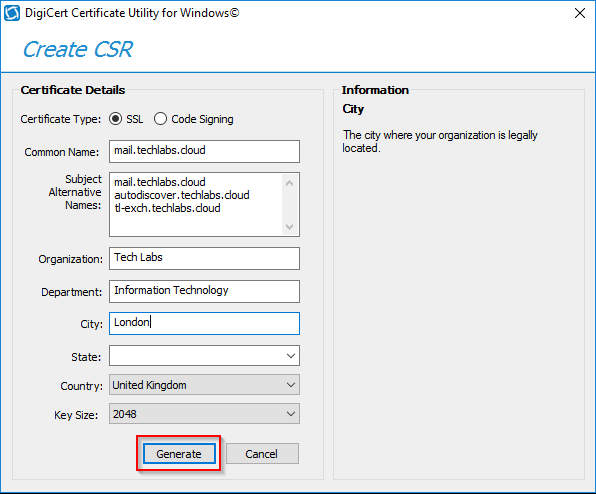
Enter the details for your certificate
Certificate Type: SSL
Common name: mail.techlabs.cloud
Subject Alternative Names:
mail.techlabs.cloud
autodiscover.techlabs.cloud
tl-exch.techlabs.cloud
Organization: Tech Labs
Department: Information Technology
City: London
Country: United Kingdom
After you've entered the details for the certificate - click Generate
Save to file


2. Get an SSL Certificate

Enter your email address and password

New certificate

Enter the domain names you want on the certificate

90 day certificate

Untick auto-generate CSR, tick paste existing CSR and then copy/paste the CSR contents

Choose the basic plan and enter your credit card details when prompted

You'll need to verify that you own the domain to create an SSL certificate.
This is done by creating DNS records with your DNS provider. Zero SSL will then check that the DNS records have been created as proof that you own the domain names.
Choose DNS (CNAME) verification
Create the CNAME record with your DNS provider
CNAME
_96C19D72159A325AB8BE7036720BDA48.mail
2DC02C0D5C28BBD33068773020A7E2FC.97EA55F0A2B8B53230CD5FB104F5F3C0.a38672106763b9c.comodoca.com

The format of DNS records and the time it takes for changes to propagate may be different depending on your DNS provider
You might need to wait for about 30 mins for the DNS changes to update before you can try and verify the domains
This example is for adding CNAME records with Google DNS

You can check if the CNAME has updated using MX toolbox
https://mxtoolbox.com/SuperTool.aspx

Once the DNS record change has propagated OK - click Next Step

Repeat the process to create CNAME records to verify each name on the certificate

When all the CNAME records have been added - click Verify Domains

Click - Install Certificate

Choose the certificate format and download certificate

Install the Certificate
Extract the certificate .zip file that you downloaded from Zero SSL
On the server that you generated the CSR on, open the DigiCert Certificate Utility - Import

Browse to select the certificate .crt file


Enter a friendly name for the certificate
e.g. mail.techlabs.cloud


5. Assign Certificate to Services
The next step is to assign the new SSL certificate to the services that you want to secure.
We won't be covering these steps in this blog post as the process will be different depending on what servers and services you are using.
Comments