You can help support this website by buying me a coffee!

How to setup SSH Key Based Authentication on Debian 11 "Bullseye". Create and manage SSH keys using ssh-keygen from Windows 10 PowerShell. Copy public keys to the server and connect using SSH keys.
Too long, didn't read version.
# Create and manage SSH keys using ssh-keygen from Windows PowerShell

# Create an ED25519 key pair with a comment
ssh-keygen -t ed25519 -C "admin-user@work-laptop"

# Create a 4096 bit RSA key pair with a comment
ssh-keygen -b 4096 -C "admin-user@work-laptop"

# Check the size of an existing key
ssh-keygen -lf C:\Users\Username\.ssh\id_rsa

# Change the passphrase of a private key file without creating a new key
ssh-keygen -pf C:\Users\Username\.ssh\id_rsa
On the server, the public key will be added to the users home directory authorized_keys file.
/home/username/.ssh/authorized_keys
ssh-copy-id -i ~/.ssh/id_ed25519.pub admin-user@server-name
# create .ssh directory and change the permissions, 700 means only the owner can read, write and execute
mkdir ~/.ssh
chmod 700 ~/.ssh

# upload the public key file to the server /home/username directory

# append contents of the public key to the authorized_keys file
cat ~/id_ed25519.pub >> ~/.ssh/authorized_keys

# remove the public key file
rm ~/id_ed25519.pub

# change permissions on authorized_keys, 600 means only the owner can read and write the file
chmod 600 ~/.ssh/authorized_keys
To delete a public key, remove it from the authorized_keys file
nano ~/.ssh/authorized_keys
SSH key based authentication
SSH key-based authentication uses a private/public key pair to log on to the server instead of a username and password. SSH keys are more secure than passwords because passwords can be brute force attacked, SSH keys cannot.
To gain access to the server, an attacker would need to get the private key file which, is only on your workstation. Getting the private key file is much more difficult than remotely brute force guessing your SSH password.
Give the key pair a name that identifies the admin user, client device and server that it is used to connect to e.g. admin-user@work-hp-laptop_web-server
This way, if a key gets compromised, you can easily identify which key needs to be de-authorized.
If you have multiple devices and key pairs and one is compromised or lost, you can connect to the server from another device and create a new key pair.
If you only have one private key, you should save it in your password manager.
Create SSH authentication keys
SSH keys can be created and managed on Linux and Windows PowerShell using the ssh-keygen command.
You can specify the authentication key type, number of bits and add a comment to the key when running ssh-keygen.
Reference:
ssh-keygen
by Author
OpenSSH authentication key utility
https://manpages.debian.org/bullseye/openssh-client/ssh-keygen.1.en.html
Which SSH authentication key type should you use?
RSA
ssh-keygen -b 4096
ECDSA
ssh-keygen -t ecdsa -b 521
ssh-keygen -t ed25519
Create an RSA key pair
# Create a 4096 bit RSA key pair
ssh-keygen -b 4096

The private/public key pair has been created in your user folder. The .pub file is the public key that will be copied to the server. The key type id_rsa is also included in the filename

Because I'm using multiple SSH key pairs, I will rename the key files adding my admin username, client device and server hostname at the end. This way, I can easily identify the admin user, workstation and server that the key pair is used for connecting to.
e.g. id_ecdsa_admin-user@work-laptop_web-server

The following PowerShell command will create a 256 bit key pair using the ED25519 algorithm with a comment
There is no need to specify the key size as all Ed25519 keys are 256 bits
-t Specifies the type of key to create e.g. Ed25519
-C Comment or name for the key
# Create an ED25519 key pair
ssh-keygen -t ed25519 -C "admin-user@work-laptop"

Show private key file fingerprint
-l show fingerprint
-f filename
ssh-keygen -lf C:\Users\Username\.ssh\id_rsa

-p change the passphrase of a private key file without creating a new key
-f filename
ssh-keygen -pf C:\Users\Username\.ssh\id_rsa
On Linux, you can use the command ssh-copy-id to copy the public key to a server. You will be prompted for an admin user password.
On the server, the public key will be added to the users home directory authorized_keys file.
/home/username/.ssh/authorized_keys
-i identity_file
ssh-copy-id -i ~/.ssh/id_ed25519.pub admin-user@server-name
There is no ssh-copy-id command on Windows so you will need to complete these steps manually.
Use SSH to connect to the server, create the .ssh directory then upload the public key file and add it to the authorized_keys file.
# create .ssh directory and change the permissions, 700 means only the owner can read, write and execute
mkdir ~/.ssh
chmod 700 ~/.ssh

# upload the public key file to the server /home/username directory

# append contents of the public key to the authorized_keys file
cat ~/id_ed25519.pub >> ~/.ssh/authorized_keys

# remove the public key file
rm ~/id_ed25519.pub

# change permissions on authorized_keys, 600 means only the owner can read and write the file
chmod 600 ~/.ssh/authorized_keys
Delete a public key
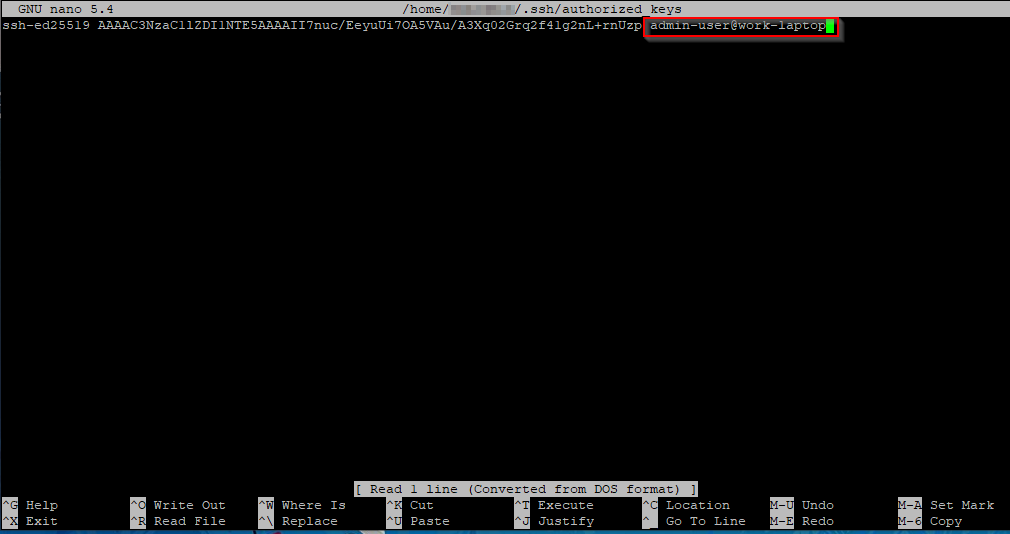
To delete a public key, remove it from the authorized_keys file
nano ~/.ssh/authorized_keys
You can see the public key fingerprint and comment identifying the user and client device.

Comments